PlaneText provides two types of implementations: direct excecution via UNIX command-line and intuitive execution via GUI on a web browser. The formats of setting and configure files are common between the two types, and therefore you can switch according to your convenience.
Command-line version
Put directory containing XML documents somewhere, then execute under “planetext” directory:
> ./bin/planetext [filename for saving tag-classification information] [XML documents directory]
then PlaneText checks unclassified tags in the XML documents according to the saved tag-classification information. If the file for saving tag-classification does not exist, it is automatically generated. After checking all documents, outermost unclassified tags detected in the documents are reported as follows:
> ./bin/planetext test.yaml data

f000179.xhtml: (1-37893) <xmlns:div id="id52849" class="content">

f000179.xhtml: (37894-37915) <xmlns:div id="id65114" class="footer">
In this example, PlaneText reports that, in data/f000179.xhtml, unclassifide tag named div enclosed
- Offset region 1-37893 with attribute “id” as “id52849” and attribute “class” as “content”
- Offset region 37894-37915 with attribute “id” as “id6514” and attribute “class” as “footer”
According to the report, a user checks actual regions in the document f000179.xhtml, and judge whether the tags are classified into either of four types (Independent/Decoration/Object/Meta-info).(A user does not need to classify all reported tags, and can leave the judge later. But, in order to proceed the process, the user should classify at least one unclassified tag.
Judged classification of tags is added to configure file by specifying the following command(, and then PlaneText again checks unclassified tags):
> ./bin/planetext test.yaml data -i div[class: content]
In this example, tag div with attribute “class” as “content” is classified via option -i (–independent) into independent tag. Thus, you can do detailed tag classification not only by classifying tag names but also by specifying the values of attributes. For more detail, please refer to --help option.
The above “report on unclasified tag” and “tag classification and recheck” until no unclassified tag is reported. After that, each XML document can be converted into plain text sequences which can be input to NLP tools via the following command:
> ./bin/planetext text.yaml data -o data-out
In this example, the conversion results are output to directory “data-out”. For each document *.ann, *.txt, *.xhtml are generated, and obtained plain text sequences are output in *.txt. The other two files will be used in the future.
Tips
- You can classify at a time several tags by lining options sequentially (e.g. “-i html -i body”).
- You can specify the number of documents containing unknown tags which PlaneText reports, by “-l (–limit) [number of documents]” option. This will help you to decrease the waiting time before PlaneText updates unknown tags based on your additional classsification. Please set the number as needed.
- You can cancel the classification of tags by -u (–unclassify) option. It requires checking of unclassified tags from scratch, and therefore may take some time.
GUI version
Make directory named “data” under PlaneText directoy, and put under “data” the directory containing target XML (XHTML) documents.
> cd planetext

> ls

Compassfile Gemfile Gemfile.lock Guardfile app bin config.ru config.yaml.example lib sessions

> mkdir data

> ls ~/hogehoge/xml_docs/

f000179.xhtml

> cp -r ~/hogehoge/xml_docs data/
If you want to make PlaneText resident, rack server such as Passenger is required; otherwise you can use temporarily GUI version by executing under PlaneText directory:
> RACK_ENV=production rackup [-p port_number]
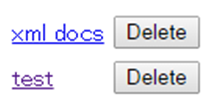 After that, data set (directory) selection menu is displayed on the web browser by accessing the above port number (http://IP address:port_number/ etc. If firewall is set on UNIX server, port forwarding is required.). In the example of the figure, directories “xml_docs” and “test” are displayed.
If you 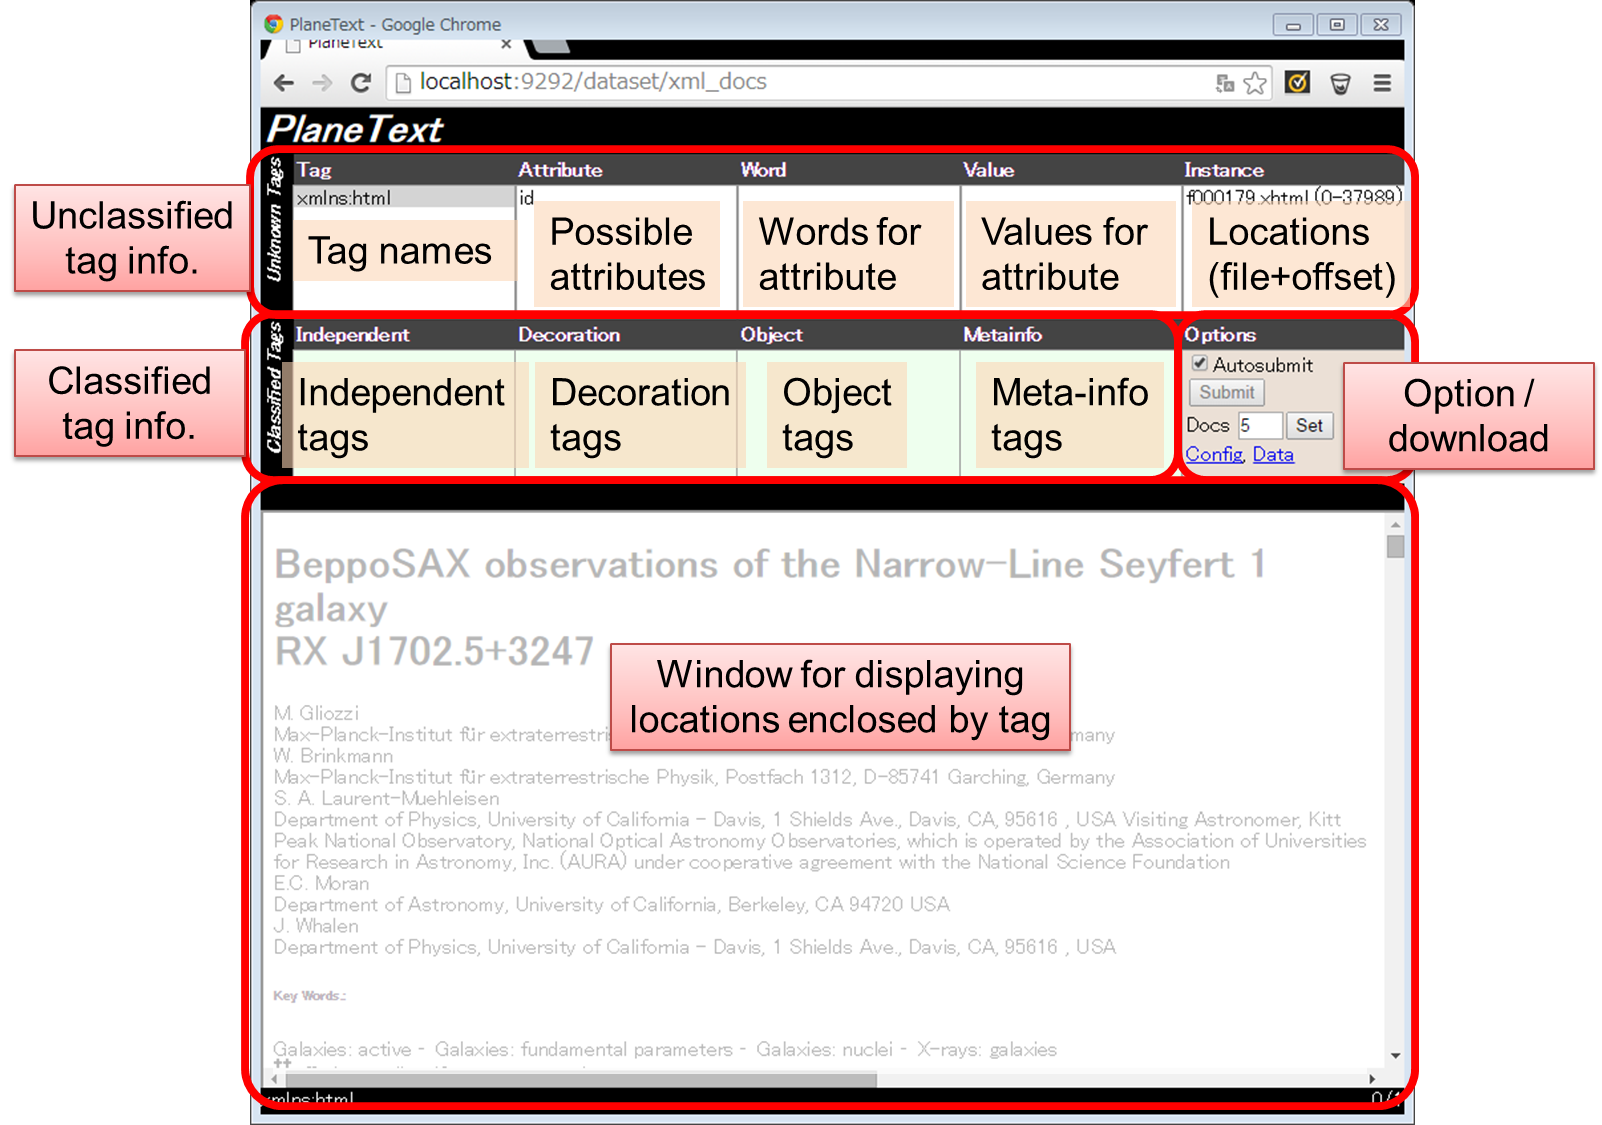 choose one of the directory, GUI tool where the target documents are already loaded is displayed on the browser. Tag classification information is automatically generated for every session, and updated in the later tag clasification.
Te upper left box reports outmost unclassified tags detected for the target documents, based on already-given tag classification in configure files. (In the case of HTML document, the tag “html” will be first displayed.)
“Attributes” accompanied by the tag is displayed by clicking the tag name. When you choose one of the “attributes”, words used as the values for the attribute are given in “Word”. When you further click one of the words, the observed combination of words are given in “Value”. In rightmost “Instance”, their locations in the documents are displayed using filename and offset-regions. By clicking one of these locations, the region enclosed by the tag is actually highlighted in the lower large box, with which a user judged the tag classification.
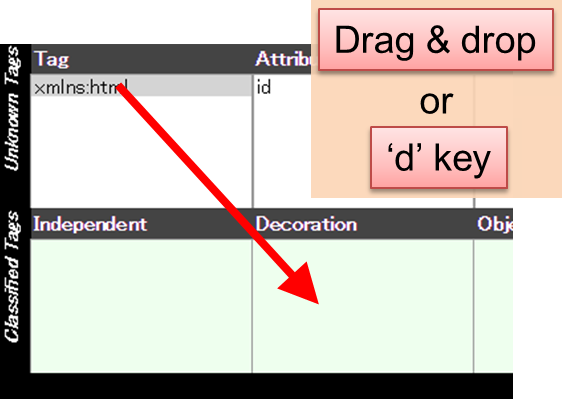 Tag classification can be done by drag & drop tag name / attribute / word into “Independent”/”Decoration”/”Object”/”Meta-info” boxes in the second row, or typing i/d/o/m keys. Thus, a user can detailed tag classification not only by classifying tag names but also by specifying attributes and their values used for the tags. The tag classification is added to configure file, based on which PlaneText rechecks unclassified tags and again reports unclassified tags on the browser.
If “Autosubmit” button is activated, unclassified tags are rechecked every after a user classiffies one tag. If the button is not activated, a user can continues the clasification of tags without recheck by PlaneText until “Submit” button is pushed.
The number specified in “Docs” box means that unclassified tags are reported until the specified number of files containing unclassified tags are found, which can shorten the waiting time for next report of unclassified tags.
When unclassified tags are not reported, the classification process is finished. The target documents are, by clicking “Date”, converted into plain text sequences which can be input to NLP tools, and the sequences are downloaded. It requires time according to the total amont of documents, and therefore not suitable for converting a large amount of documents.
When you want to convert a large amount of documents, first download configure file containing tag-classification information by clicking “Config”. It would be safer to load this file into command-line version and execute conversion.
Tips
- PlaneText checks classified tags from upper ones. You can change the order by drag and drop although PlaneText then re-checks all the tags from scratch, which can take some time.
- Classification of tags can be canceled by doing drag and drop from “Classified Tags” to “Unknown Tags” or pressing ‘u’ key. It requires re-checking of tags from scratch, which can also take some time in the same manner as re-ordering of classification.
- Classification of tags can be done by mouse operation (click and drag & drop) alone, by keyboard operation (cursor key, i/d/o/m/u keys) alone or by both. Please try and find your convenient way.
Combination of command-line and GUI versions
The formats of configure files recording tag classification are common between command-line and GUI versions. You can therefore use the (complete/incomplete) tag classification by GUI in command-line by downloading the configure file from “Config” link.
PlaneText は UNIX コマンドラインからの実行と、Web ブラウザを介した GUI ツールからの直感的実行の2通りの実行方法に対応しています。どちらもタグ分類などの設定ファイルは共通ですので、適宜切り替えての実行が可能となっています。
● コマンドラインからの実行
既にタグ分類がほぼ確定しており、大量の文書の変換を行いたい場合は、こちらが便利です。1から分類作業を行うことも可能ですが、大量の文書を対象とする場合は、少量のサンプル文書で GUI ツールを用いてある程度タグの分類を済ませた後にこちらを利用される方が効率的でしょう。
● Web ブラウザを介した GUI ツールを用いて実行
分類作業を直感的に行いたい、タグが文書上のどこを示しているのかを視覚的に確認しながら分類したい場合には、こちらが便利です。Web ブラウザを介しますので、大量の文書に対して分類から変換まで、全ての作業を完遂するのは厳しいですが、コマンドライン実行で大量の文書に適用する前に、少量の文書である程度の分類を済ませておきたい、といった用途などに適しています。
初めて使用される場合は、まずは、オンラインデモまたはご自身のサーバで GUI ツールを試して感覚を掴まれるのがお薦めです。
以下では、それぞれの実行方法における分類および変換方法について説明します。(サーバの設定等については、パッケージのマニュアルを参照の上、お使いのサーバ環境の下で適宜行ってください。)
コマンドラインから実行する場合
解析対象の XML 文書群が入ったディレクトリをサーバ上に置いてください。その上で、PlaneText ディレクトリ直下で
> ./bin/planetext [タグ分類情報を保存するファイルの名前(任意)] [対象文書のディレクトリ名]
を実行すると、指定したファイル内で定義されているタグ分類情報に基づいて、各 XML 文書の未分類タグのチェックを行います。「タグ分類情報を保存するファイル」がまだ作成されていない場合は、自動的にファイルが作成されます。全ての文書のチェックが完了すると、各文書において、最も外側で検知された未分類タグが以下のようにレポートされます。
> ./bin/planetext test.yaml data
 f000179.xhtml: (1-37893) <xmlns:div id="id52849" class="content">
 f000179.xhtml: (37894-37915) <xmlns:div id="id65114" class="footer">
この例では、div という未分類のタグが文書 data/f000179.xhtml の
- オフセット 1-37893 の領域を、アトリビュート id の値が id52849, class の値が content
- オフセット 37894-37915 の領域を、 アトリビュート id の値が id65114, class の値が footer
で囲んでいることが報告されています。この報告を踏まえ、実際に文書 f000179.xhtml の該当箇所を確認し、そのタグが4分類(独立・装飾・実体・非表示)のいずれに相当するかを判断します(必ずしも報告された全てのタグを分類する必要はなく、判断を後回しにすることも可能ですが、少なくとも1つのタグを分類しなければ、作業は進みません)。
判断した分類情報は、以下のようなコマンドで指定することで、タグ分類ファイルに追加され、その情報を踏まえて、改めて未分類タグのチェックが行われます。
> ./bin/planetext test.yaml data -i div[class: content]
この例では、class アトリビュートの値が content となっているようなタグ div を -i (–independent) オプションで独立タグに分類しています。このように、タグだけでなく、その中で用いられているアトリビュートの値も指定して、詳細なタグ分類を行うことが可能です。詳しくは、--help オプションの情報を参照してください。
以上の「未分類タグの報告 –> タグを分類して再チェック」の操作を繰り返し、最終的に未分類タグが報告されなくなったら、タグの分類は完了したことになります。あとは、以下のコマンドにより、各文書内のテキストを、NLP ツールに入力できるような平文テキスト列へ変換することが可能です。
> ./bin/planetext text.yaml data -o data-out
この例では、ディレクトリ data-out に、各文書の変換結果が出力されます。各文書には、*.ann, *.txt, *.xhtml の3種類のファイルが作成されますが、獲得された平文テキスト列は *.txt に出力されています。その他のファイルに関しては、今後のアップデートで利用する予定のものです。
Tips
- オプションを並べることで一度に複数のタグ分類を行うことが可能です。
- -l (–limit) オプションで文書数を指定すると、未分類タグを含むファイルがその文書数分のみ現れるまでチェックして報告します。大量の文書で分類作業を行う際に、未分類タグチェックの待ち時間が短くなる効果等が期待できます。必要に応じ設定を行ってください。
- 分類をやり直すことも可能です。-u (–unclassify) オプションで分類済みのタグを指定してください。ただし、未分類タグを一からチェックし直すため、実行終了までに多少時間がかかる可能性があります。
GUI ツールを用いて実行する場合
PlaneText ディレクトリ直下に data という名前のディレクトリを作成し、その下に変換対象の XML (XHTML) 文書群が入ったディレクトリを置いてください。
> cd planetext
 > ls
 Compassfile Gemfile Gemfile.lock Guardfile app bin config.ru config.yaml.example lib sessions
 > mkdir data
 > ls ~/hogehoge/xml_docs/
 f000179.xhtml
 > cp -r ~/hogehoge/xml_docs data/
PlaneText を常駐させるのであれば Rack server (Passenger 等) が必要になりますが、そうでなければ、PlaneText のディレクトリ直下で
> RACK_ENV=production rackup [-p ポート番号]
とすれば、このコマンドの実行中は、GUI ツールを利用可能になります。
その上で、Web ブラウザ経由で上記のポート番号にアクセス (http://IPアドレス:ポート番号/ 等。UNIX サーバでファイアウォールの設定がされている場合は、ポートの開放操作が必要です。) すると、データセット(ディレクトリ)選択画面が表示されます(図の例では xml_docs と test の2つのディレクトリが表示されています)。
 対象の文書群が入ったディレクトリを選ぶと、そのディレクトリを読み込んだ GUI ツール画面が表示されます。その際、分類済みのタグ情報などが格納されるコンフィグファイルはセッション毎に作成・保存され、その後のタグ分類作業で更新されていきます。
画面には、コンフィグファイル内で定義されたタグ分類情報を踏まえて、各 XML 文書の未分類タグのチェックを行った結果として、各文書において、最も外側で検知された未分類タグ名が、画面左上の欄にレポートされます(XHTML ファイルであれば、初めは html が表示されることでしょう。)。
この各タグ名をクリックすると、どのような属性 (Attribute) を伴ってに現れたかが Attribute 欄に表示されます。この属性のいずれかを選択すると、その属性値として実際に使われた言葉が Word 欄に示され、さらにそのいずれかを選択すると、実際にどのような組み合わせで観察されたかが Value 欄に表示されます。一番右端の Instance には、現時点で選択されたこれらの要素の条件で、文書内で実際にタグが現れている箇所を、ファイル名とオフセット領域(括弧内)毎で示しています。このいずれかを選択すると、下のウインドウに、実際にタグが囲んでいる箇所が、文書上に視覚的に網掛けされて表示されますので、これを確認しながら、そのタグが4分類のいずれに相当するかを判断することになります。
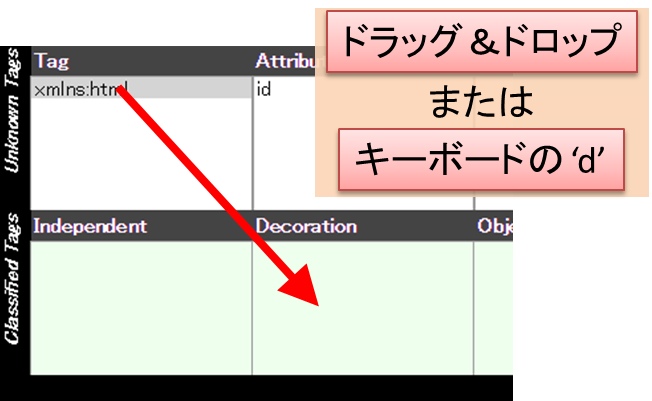 分類作業は、タグ名・特定の属性・属性に使える語をマウスで2段目の Independent (独立) / Decoration (装飾) / Object (実体) / Metainfo (非表示) にドラッグ&ドロップするか、あるいは、分類対象を選択した状態で分類名の頭文字 i/d/o/m をキー入力することで行えます。このように、タグだけでなく、その中で用いられている属性・属性値レベルでの指定により、詳細なタグ分類を行うことが可能です。この分類は、コンフィグファイルに書き込まれ、これを踏まえて、PlaneText は未分類のタグの再チェックを行い、改めて画面に未分類タグの情報を報告します。
2段目右端の Autosubmit オプションがチェックされていると、タグを1つ分類する度にコンフィグファイルに分類が書き込まれ、すぐに未分類タグの再チェックを行います。チェックが外されている場合は、その下の Submit ボタンが押されるまでは、未分類タグの再チェックはせずに、タグの分類作業を続けることができます。
また、その下の Docs に指定された数は、未分類タグを含むファイルがその文書数分のみ現れるまでチェックして報告することを意味しており、大量の文書で分類作業を行う際に、未分類タグチェックの待ち時間が短くなる効果が期待できます。必要に応じて変更を行ってください。
最終的に、左上に未分類タグが表示されなくなった段階で、分類は終了です。2段目右端 Options の Data をクリックすると、これまでのタグ分類情報が格納されたファイルをもとに、各文書が NLP ツールに入力可能な平文テキスト列へと変換され、そのデータを一括でダウンロードできます。この変換には文書サイズに応じて多少の時間がかかりますので、大量の文書の変換にはあまり向いていません。
大量の文書を変換する場合は、Config をクリックすると、これまでのタグ分類情報を保存したファイルがダウンロードできます (“ディレクトリ名.yaml”) ので、これをコマンドライン版に読み込ませて変換を行う方が無難でしょう。
Tips
- 分類には優先順位があり、各分類情報の上の方からチェックが行われていきます。また、分類済みのタグの間にタグをドラッグ&ドロップすることによって、優先順位に割り込みをかけることができますが、その際には、未分類タグを一からチェックし直しますので、次の表示が遅くなる可能性があります。
- 分類をやり直すことも可能です。分類済みのタグから未分類タグの方へとドラッグ&ドロップしてください。ただし、前項同様、未分類タグを一からチェックし直すため、次の表示までに多少時間がかかる可能性があります。
- 分類操作は、マウス操作(クリック、ドラッグ&ドロップ)のみ、あるいはキーボード操作(方向キー、i/d/o/m/u キー)のみでも行えるように作られていますので、操作しやすい方法を適宜お試しください。
コマンドライン・GUI ツールの併用について
タグ分類情報を保存するファイルの仕様は、コマンドライン・GUI ツール共通ですので、GUI ツールで行った分類情報のファイルを Config をクリックしてダウンロードすれば、コマンドラインでの実行にもそのまま利用することが可能です。